

"Everything looks fantastic! Thx again." Richard, Warwickshire
See more about what our clients have to say...
Click to View Products by CategoryFURNITURE
- Bespoke Oak Furniture
- Dining Tables
- Seating
- Dressers
- Bedroom
- Occasional
- Storage & Display
- TV Stands & Cabinets
- Corner Cupboards
- Study
- Miscellaneous
- Ranges
ACCESSORIES
IT'S ALL ABOUT VALUE...
- Best let our clients tell You... Independently from us
- 10 great reasons why you should choose Early Oak Reproductions
- The value of quality British handmade furniture
- Special story from our Belgium client
AND TRANSPARENCY...
AND ITS MORE THAN JUST FAITH...


Oak Furniture Construction - The Mortise and Tenon Joint
You won't see it! That little gem hidden away, within the structure of our 'joined' furniture. A simple, yet ingenious device that revolutionised furniture making in Medieval Europe. Today, some five centuries or so later, we still rely on the ubiquitous mortise and tenon joint, to perform its role as an essential element of virtually any quality wooden framed construction. Be it furniture or building.
It enables lengths of wood to be securely joined together, usually at right angles (90 degrees), to form a simple square or rectangular frame. Dividing pieces can also be inserted at the same time. The frame can then be added to, at each end, and at intervals in between if required, to create a three dimensional structure.
This assembly can be left as it is, to form the base of a table or stool, for example.
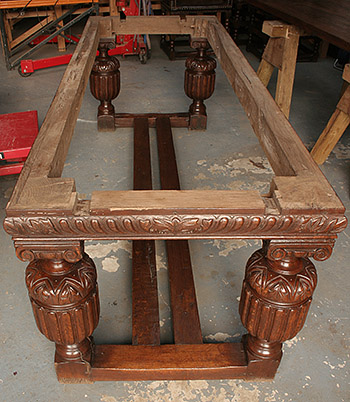
The 'open' base of a carved dining table, originally designed and made by the author from old reclaimed oak. Here, the top (structural) rails have been joined at the top of the legs and the end stretchers to the base of the legs, to form a three dimensional structure, all using mortise and tenon joints.
Note that the upper perimeter has been decorated by the addition of 'gadroon' carved lengths of oak, fixed to the outer face of the structural top rails.
I have deliberately omitted mentioning the paired centre stretchers, because they were in fact dovetailed into the end stretchers underneath. This was purposely done, to create the illusion of the table having undergone alterations to the stretcher arrangement (from all round stretchers) at some time. More on this in a later blog!
© Early Oak Reproductions. Reproduced from Nicholas Berry's photo archive.
Alternate to leaving the frame open, we can insert panels into the apertures to permanently close parts of the box. Usually, this 'closed' box is left open on one side, to accept doors and drawers, or a lid. In this configuration, we have the makings of a multitude of useful storage systems; cupboards, dresser bases, chests, for example.
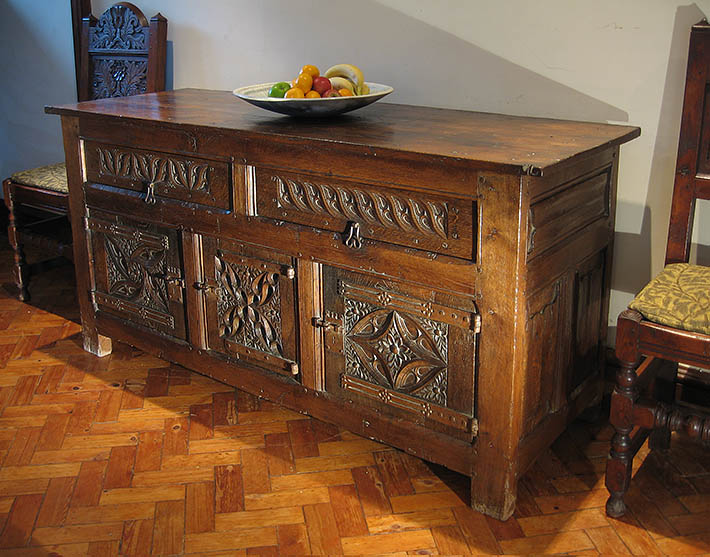
An early 16th century style carved oak cupboard, originally designed and made by the author, from old reclaimed beams. Here you can clearly see the framework, which has all been assembled using mortise and tenon joints. Linenfold oak panels are permanently fixed into grooves on the sides, whereas the front framework is left open, into which drawers and doors have been inserted.
© Early Oak Reproductions. Reproduced from Nicholas Berry's photo archive.
CONSTRUCTION
To prepare, the craftsman will saw and plane various lengths of timber into square or rectangular cross sections of predetermined dimensions.
Basically, the joint is made up of two parts.
The end of one piece of timber is reduced in cross section, either on two opposing sides, or all four. This reduction is then terminated, a short way up the length, to form a shoulder. We call this a tenon. On the other piece of timber a rectangular hole is cut, to the same dimensions as the above tenon. This will be deep enough to accommodate the tenon length on the first piece. The rectangular hole is called the mortise. The mortise usually stops before it reaches the other side, but it can also go right through the timber.
The tenon can now be inserted into the mortise.
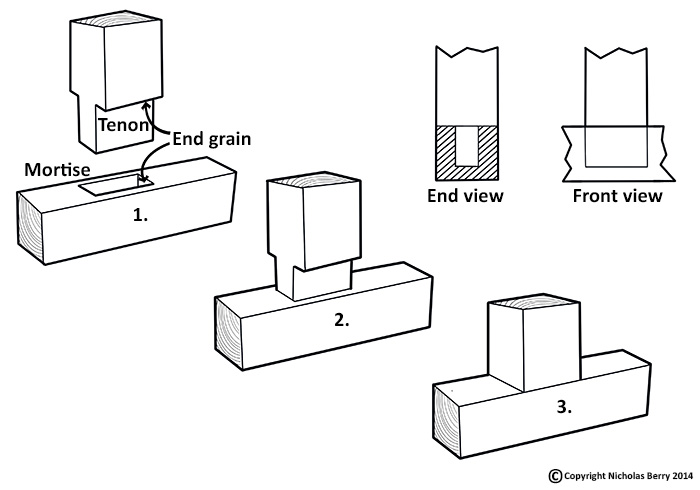
The drawing above illustrates the most basic of mortise and tenon joints. In most joinery, whether furniture or architectural woodwork, the design of the shoulders becomes more complex, to take into account mouldings, rebates and panel grooves, for example. Essentially though, the principal remains exactly the same; a rectangular section tenon, inserted into the same size mortise.
To prevent the two components from coming apart we can apply glue to the larger meeting surfaces, i.e. the surface with the word 'Tenon' on, above, which is called the cheek, and its corresponding surface inside the mortise hole. The two components are then clamped together until the glue sets. The experienced joiner will know not to bother applying glue to the end grain (indicated above), as it will be ineffective.
We now have a finished mortise and tenon joint, save for planing/scraping the joined surfaces flat.
It is perhaps a source of some consternation, for the diligent artisan, that much of their toil and skill becomes hidden forever, self-contained within their work. Yet it is this very fact, however, that is largely why this enduring joint has proved to be so successful.
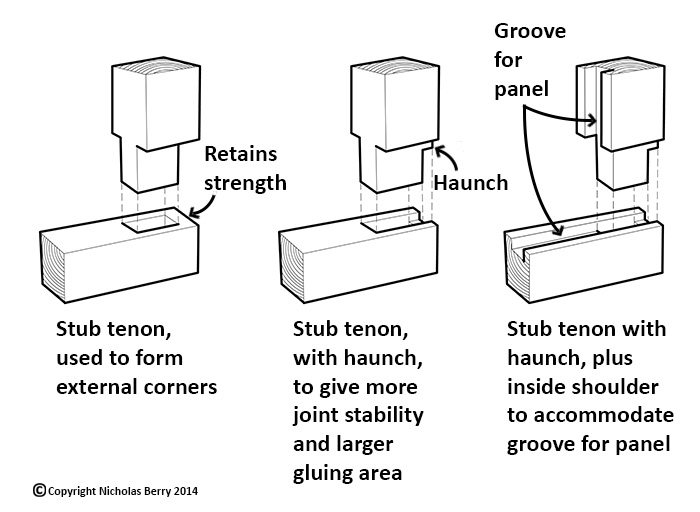
The drawing above shows slightly more advanced mortise and tenons, as commonly used in joinery work. In the first diagram, the tenon is formed on three surfaces, thus creating three shoulders. This enables a corner joint to be produced, without unduly weakening the end of the mortised timber. In the right diagram, the panel groove continues right to the end of the timber, to accommodate the tenon haunch. In the days when hand-held plough planes were used, this method made it much easier for the joiner to cut the groove right through the whole length, rather than attempt to start part way in.
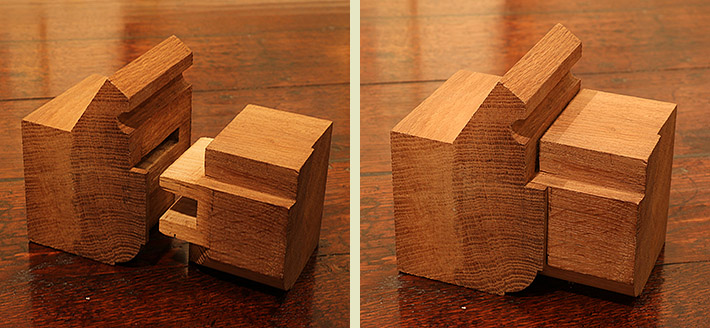
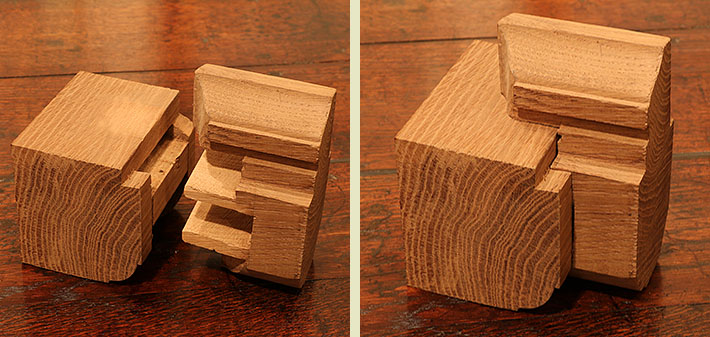
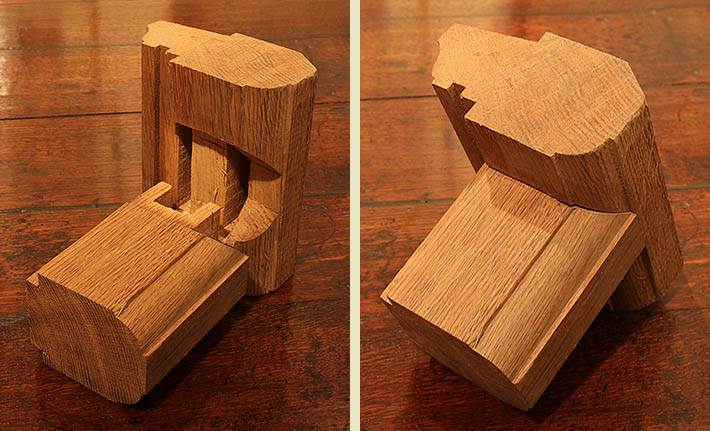
Below are some rather more complex joints. They are actually prototypes, made by the author, in preparation for making a set of large transom bay windows in air dried oak. With external work, particular attention has to be paid to how efficiently the joint will repel any rainwater ingress.
HISTORICAL NOTES
The mortise and tenon joint first appeared in Europe, during the latter part of the Middle Ages, and was developed primarily to overcome the problems of shrinkage associated with nailing wide boards together - a pretty basic way of making (earlier prevalent) boarded furniture. It is perhaps an appropriate opportunity to mention that oak, like most timbers, shrinks across the grain, as it dries, rather than along it. Also, our forbears didn't have the benefit of modern kiln drying facilities! Consequently, fixing (even fairly) unseasoned boards together, with each grain at ninety degrees, is likely to result in splitting/cracking across the fixed width of the board.
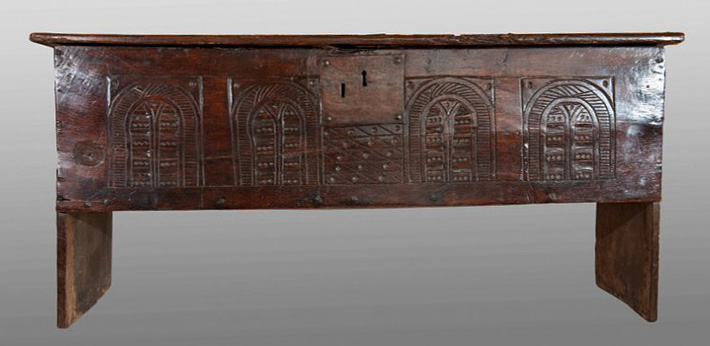
An oak boarded chest circa 1530, showing the wide one-piece (horizontal running grain) front board, nailed to the one-piece (vertical running grain) side planks. It is easy to see the potential problem here, where the horizontal board will have a tendency to shrink across it's width (in this case vertical), but is restrained by the side panels.
© Photo reproduced by kind permission of Marhamchurch Antiques.
As a solution to this problem, inserting individual panels into grooves formed around the inside edge of the mortise and tenoned framework (see diagram above), means the panels are free to expand and contract, unconstrained within the grooves. Thus, any tendency to split or crack is virtually eliminated, and the integrity of the piece, as a whole, remains intact.
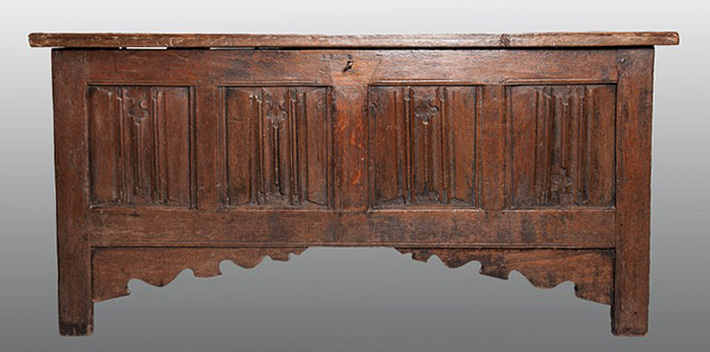
A joined chest, from around the same period as the boarded one above, except that the front of this piece is made up of a framework, mortise and tenoned together, with individual panels inserted.
© Photo reproduced by kind permission of Marhamchurch Antiques.
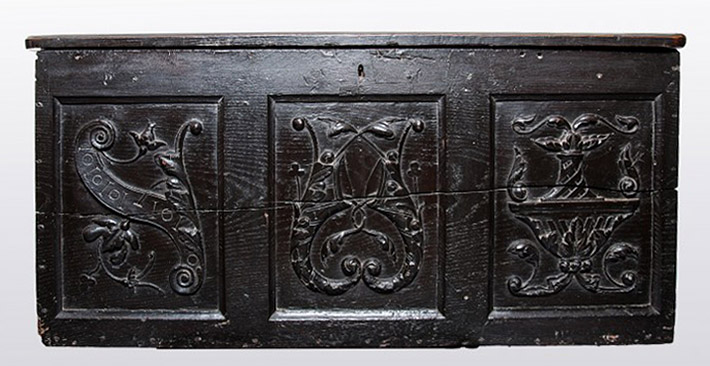
An oak chest from around the same period as both of the above examples although, interestingly, the front is still actually just one wide board nailed to the sides, i.e. a boarded chest. In an attempt to 'lift' the status of the piece, the maker has chosen to emulate the more expensive joined construction. Clearly an aspirational exercise! Note the crack running the entire length of the board, caused by shrinkage. However, on a piece of such age, this technical defect, which has long since stabilized, actually enhances its appeal!
© Photo reproduced by kind permission of Marhamchurch Antiques.
The other benefit from a frame and panel construction, using mortise and tenon joints, is the ability to cover very large areas, with relatively small individual components. This breakthrough in early joinery techniques is perhaps best demonstrated in the huge numbers of beautiful oak panelled rooms seen in 16th and 17th century buildings. These structures also have the advantage of light weight and flexibility of movement.
Before the use of glue became widespread, the mortise and tenon joint was fixed by means of pegs driven through both components. The holes of each were slightly offset and the peg tapered, so as it was driven in, the joint was pulled tight.
This method of fixing the joint is known as 'drawer-bored and pegged'.
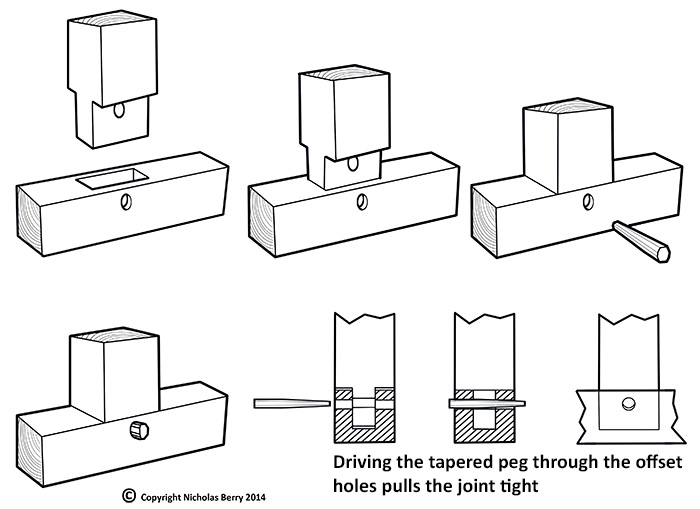
Although more time consuming than gluing and clamping, this is a very powerful means of pulling the joint tight and, from personal experience, often more effective than the aforementioned. For wide components, two pegs can be used.
Moreover, the meeting surfaces don't require the same accuracy of fit, as they are not reliant on tight fitting surfaces for glue (although no self respecting craftsman would ever condone badly fitting joints!).
There is, however, another important advantage to this method, in that the pegs can be driven back out (see note below) and the joint disassembled. This is a more necessary facility in timber framed buildings though, rather than furniture.
Centuries ago, the framework of buildings were first put together in a framing yard, each joint being individually marked for later reference.These 'carpenters marks', usually made up of Roman numerals, are still clearly visible close to the joints in many historic buildings. The frame was then dismantled, transported to site, where it was re-erected, using the 'carpenters marks' as a reference.
Contemporary oak framing companies still work in much the same way, except the markings are now more likely to be stamped metal labels.
As mentioned above, pegged joints also allows for a surprising degree of flexibility in the movement of the frame. Evidence of this is clearly visible in the many old buildings we see today, which are leaning all over the place, some in quite an alarming manner, without actually falling down!
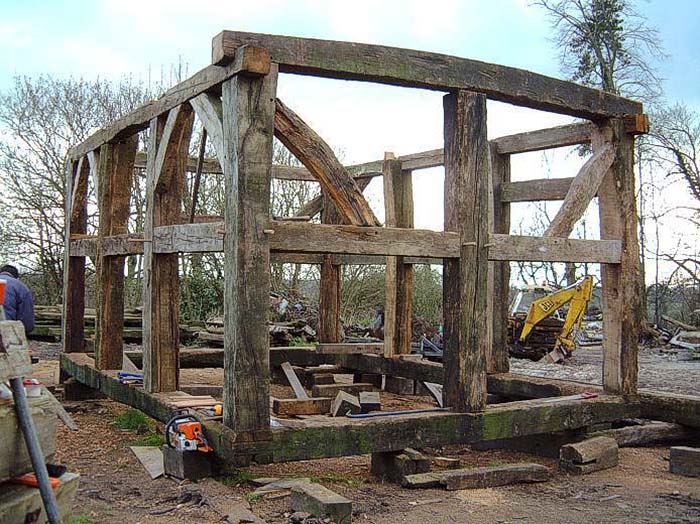
An oak frame, being built by the author at the wood yard, from old re-claimed beams. Here you can see the mortise and tenon joints pegged together. However, the pegs haven't been driven fully home, so they can be easily knocked back out to enable dismantling of the frame.
© Early Oak Reproductions. Reproduced from Nicholas Berry's photo archive.
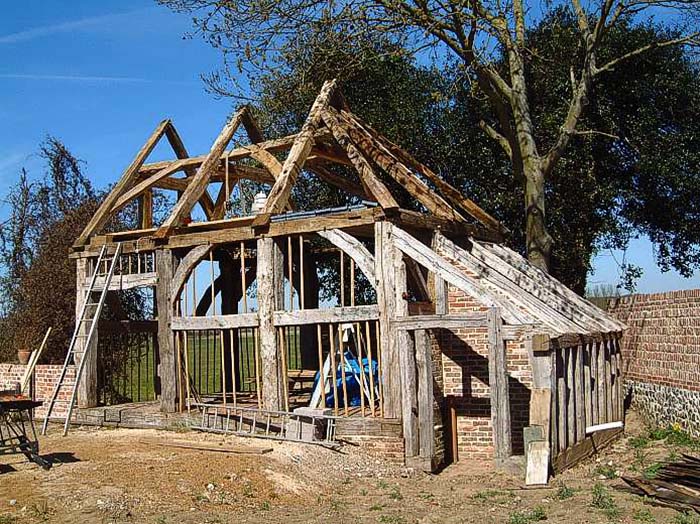
Here is the same frame re-erected at its permanent site, with all the pegs driven home and the joints pulled tight.
© Early Oak Reproductions. Reproduced from Nicholas Berry's photo archive.
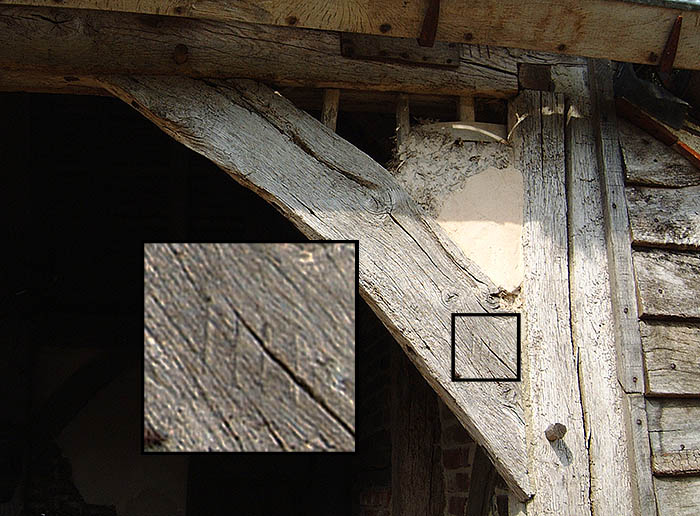
Carpenters marks just visible on the curved wind brace.
© Early Oak Reproductions. Reproduced from Nicholas Berry's photo archive.
Note: It is not always possible to knock out very small furniture pegs. However, providing there is enough flat end surface area at the thinner end, they can be driven out with the careful use of a small steel drift (short round bar) and hammer. Alternatively, it is possible to drill a small hole through the peg and then carefully break the peg out. This requires caution, as too large a drill bit will destroy the original offset holes and re-assembly will never be as good.
Author; By Nicholas Berry
Bespoke Reproduction Early Oak Furniture Specialist From a little boy at infant school, I've had a passion for early architecture and furniture, embracing the 15th, 16th, 17th and 18th centuries. I've spent almost three decades designing and making replica early oak furniture (and architectural woodwork)...with my own hands!
Nowadays, together with a team of highly skilled and equally passionate craftspeople, I use that valuable experience helping clients commission, from our company, the very best in bespoke oak reproduction furniture, with a particular emphasis on personal service.
Circle Nicholas Berry on Google+ Profiles (opens in new window)
© Early Oak Reproductions
Bibliography:
Oak Furniture - The British Tradition by Victor Chinnery
All our prices include VAT and free mainland England delivery. Details here of our UK and overseas delivery service
Easy to place your order and pay...
You can simply place your order here on our website by using our intuitive selection boxes (on any of our product pages) and then continue through to your basket page (you'll need to register with us first - see 'Login/Register'). You can email or phone us to pay for your order, or visit us personally at our showroom. Click here for contact details. We accept BACS transfer, cheque, credit card or debit card payments.
However you want to order, we've made it both straightforward and safe (see our accreditation's below).
Safe shopping - online & offline:


This work is licensed under a Creative Commons Attribution-NonCommercial-NoDerivatives 4.0 International License.